
Wednesday, May 28, 2014
It fits!
I did a test fit with the new holding tank and it fits. I need to make a support for the bottom of the tank and finish the new hatch but very happy with the progress to date.
Once the support is in I'll screw in some hold downs at the front and back of the tank and also run a hatch support brace. I'm waiting for some teak trim strips now - hope they arrive before the weekend so I can complete the new hatch.
Sunday, May 25, 2014
Tank exposed!
I finished cutting the teak and holly ply and exposed the cabin sole fiberglass.

I marked cut lines on the fiberglass and cut 1/2" away from the teak so that I could maintain a lip for the new floor to rest on. Front to back dimensions are good but not sure if side to side dimensions will allow new tank to fit. Will try once I get the old one out.

Tomorrow I'm going to start cutting the tank up!
I marked cut lines on the fiberglass and cut 1/2" away from the teak so that I could maintain a lip for the new floor to rest on. Front to back dimensions are good but not sure if side to side dimensions will allow new tank to fit. Will try once I get the old one out.
Tomorrow I'm going to start cutting the tank up!
Holding tank replacement begins
I spent the morning laying out guide strips so that I could begin cutting the floor for holding tank removal. My first shore is to cut a clean outline in the teak and holly plywood floor. I decided to use my small laminate router and some oak 1x2 strips as guides. My first cut was along the door into the head. I can not continue the router cut near the doorway so will save that for the JobMax. I then mounted my cut guide to the floor in the area where I will destroy the existing teak so that I will have a clean cut on the outside of my cut.

I then made two cuts inside my guide before moving one hold down so that I could continue cutting.

Eventually, after moving the guide around the floor I was able to cut everything that was accessible with the router. This morning I will use the JobMax and some aluminum cut guides to finish the cutout before digging in for the heavy cutting.
 You can see screw holes inside the cut area - these are from the cut guides but this material will be destroyed anyway
I then made two cuts inside my guide before moving one hold down so that I could continue cutting.
Eventually, after moving the guide around the floor I was able to cut everything that was accessible with the router. This morning I will use the JobMax and some aluminum cut guides to finish the cutout before digging in for the heavy cutting.
Thursday, May 15, 2014
More rigging
I made good progress on reinstalling the forestay inside the Harken Roller Furling unit foils.

New topcap with toggle ready to be hauled back up the mast.

Test installation of the Norseman swagless fitting. I still need to take the fitting off, trim the lower foil then reinstall the foil, torque tube and then permanently install the Norseman.
Next, the head stay - longer and heavier!
New topcap with toggle ready to be hauled back up the mast.
Test installation of the Norseman swagless fitting. I still need to take the fitting off, trim the lower foil then reinstall the foil, torque tube and then permanently install the Norseman.
Next, the head stay - longer and heavier!
Monday, May 12, 2014
AC Problem
While we were working on the staysail stay the AC suddenly quit working. I had a chance to do some troubleshooting today and the AC runs fine - except the compressor does not try to start or run. Voltage checks show that everything else is working as told to by the thermostat so I removed the control board.
Luckily I snagged a schematic for the entire unit in 2004 so it was fairly easy to troubleshoot - appears that the compressor run relay was being energized but no AC power to the compressor.


Luckily I snagged a schematic for the entire unit in 2004 so it was fairly easy to troubleshoot - appears that the compressor run relay was being energized but no AC power to the compressor.
A closer look with the control board out shows a melted solder joint on the compressor power lead on the relay.
Joint has been resoldered and I will reinstall in the next day or two.
Hope to finish an electrical upgrade on a Pacific Seacraft tomorrow then back to AC and rigging on Gra'inne.
Sunday, May 4, 2014
New rigging?
We started working on the staysail stay this morning which involves removing the forestay (foil still attached) and laying it out on the dock. As soon as we had the old stay on the dock we realized we had a problem!

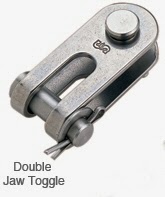
The old head fitting is different than the new one we got from Seco South. Not a big deal as the new wire is long enough but I will have to order a new double jaw toggle or have the old fitting cut off and a new jaw toggle installed. I'm going with a new double jaw toggle.
 Turns out that the head stay already has one of these attached so once we finish both fore stays will be configured the same.
Once we have the new fitting we will pull the old wire out of the foil, pull in the new wire, mark and cut (after measuring 5 times) the new wire, install the new Norseman stud terminal, reassemble the furling unit and pull everything back up the mast.
Rigging on this boat has been quite interesting!
The old head fitting is different than the new one we got from Seco South. Not a big deal as the new wire is long enough but I will have to order a new double jaw toggle or have the old fitting cut off and a new jaw toggle installed. I'm going with a new double jaw toggle.
Once we have the new fitting we will pull the old wire out of the foil, pull in the new wire, mark and cut (after measuring 5 times) the new wire, install the new Norseman stud terminal, reassemble the furling unit and pull everything back up the mast.
Rigging on this boat has been quite interesting!
Subscribe to:
Posts (Atom)